

hmmm... one all. so who's serve is it now?Originally Posted by dansoi_1234

everyone here's willing to help. keep on shooting!
Results 171 to 180 of 189
-
02-08-2010, 04:17 PM #171

- Join Date
- May 2003
- Posts
- 2,672

-
02-08-2010, 04:46 PM #172Junior Member

- Join Date
- Jun 2009
- Posts
- 308
If i were you, i would stop the struggle and give in to the desire.... turn that nob in your camera to 'Aperture Priority' and start learning what the camera does everytime you increase/decrease the aperture opening. Then when you understand them already, go back to manual mode and see what you have been missing all along... Originally Posted by tiffanybam
Why aperture priority? Based on experience, most people would prefer to control the amount of area that is in focus when they compose. To do that, you have to adjust the aperture opening. In aperture priority, you decide how much is in focus (aperture opening) and let the camera adjust the shutter speed. It is also notable to remember that in Aperture Priority, you can also adjust the ISO rating of the sensor. In short, in Aperture Priority mode, the slave is the shutter speed while Aperture size and ISO rating is adjustable...
Go ahead, try it... if you are still skeptical about leaving the manual mode... ask unfamous, dansoi_1234, chipmunk888, and slycry...
to help you understand more how they interact, visit this link and read about the exposure triangle. You don't have to attend expensive seminars to understand the basics of photography. They are free in the internet...
-
02-08-2010, 07:51 PM #173Senior Member

- Join Date
- Dec 2009
- Posts
- 958
I'm using the Av mode .. its much easier for me and my shots are better than before, especially now that i understand the basic principles, bt still eager to learn more ..
 I'm not saying this because sir macoy taught me, its because i also experienced it.. bt then again it's up to the person whatever mode you use as long your happy with the result..
keep shooting guyz and always learn from every mistake.. ..
-
02-08-2010, 08:16 PM #174Site Keeper

- Join Date
- Nov 2002
- Posts
- 3,120
+1 to this. I'm an Av (Aperture Priority) shooter. I shoot mainly in Av and adjust the exposure compensation according to what I prefer. But I go manual when I have my flash hooked up or when in strobist mode.
 I rarely go Tv (shutter priority).
Now, sige vote your choice here: https://www.istorya.net/forums/photog...=shooting+mode

Originally Posted by therealmacoy
-
02-08-2010, 09:26 PM #175Junior Member

- Join Date
- Feb 2010
- Posts
- 76
thanks sir. i appreciate it. Originally Posted by abortretryfail
-
02-08-2010, 09:29 PM #176Junior Member
- Join Date
- Feb 2010
- Posts
- 76
If i were you, i would stop the struggle and give in to the desire.... turn that nob in your camera to 'Aperture Priority' and start learning what the camera does everytime you increase/decrease the aperture opening. Then when you understand them already, go back to manual mode and see what you have been missing all along...
Why aperture priority? Based on experience, most people would prefer to control the amount of area that is in focus when they compose. To do that, you have to adjust the aperture opening. In aperture priority, you decide how much is in focus (aperture opening) and let the camera adjust the shutter speed. It is also notable to remember that in Aperture Priority, you can also adjust the ISO rating of the sensor. In short, in Aperture Priority mode, the slave is the shutter speed while Aperture size and ISO rating is adjustable...
Go ahead, try it... if you are still skeptical about leaving the manual mode... ask unfamous, dansoi_1234, chipmunk888, and slycry...
to help you understand more how they interact, visit this link and read about the exposure triangle. You don't have to attend expensive seminars to understand the basics of photography. They are free in the internet...
yes sir, thank you. i have been reading Darren Rowse's photograhy tips. ni subscribe ko for free and dako kau tabang.Last edited by tiffanybam; 02-08-2010 at 09:33 PM. Reason: error
-
02-08-2010, 10:19 PM #177Junior Member
- Join Date
- Jun 2009
- Posts
- 308
That's good to hear... don't just read. Practice them... Originally Posted by tiffanybam
...
-
02-09-2010, 12:10 PM #178
- Join Date
- May 2003
- Posts
- 2,672
I posted this link earlier but it got buried in the thread. it's a nice
online exposure simulation that's nice to play with...start off with the "shutter and aperture" section and try each one
individually and then together.
then try the "iso section" and "camera shake."
now when I'm out on the field how do I know which one to use?
it depends.
are you taking portraits where you want control of your depth of field?
then start off with your aperture then balance it off with your shutter speed.
or set your camera to aperture priority where you select your desired aperture
and your camera will select the "appropriate" shutter speed.
are you taking action shots where you want to freeze or show flow of motion?
then start off with your shutter speed then balance it off with your aperture.
or set your camera to shutter priority where you select your desired shutter spped
and your camera will select the "appropriate" aperture.
you have your settings to get the shot you want but the photo still
comes out too bright or too dark and you've run out of options in
the selection of aperture and/or shutter speed? then adjust your iso
ok... cool! but how will I know my photo will come out "properly exposed"
first you should understand meters... there are two basic categories:
- incident meters
- measures light falling on a subject
- usually found in hand held lightmeters
- more or less very accurate giving you "properly" exposed shots if you use the settings it gives you
- reflective meters
- measures light reflecting off a subject
- usually found in cameras so you better be familiar with this one
- very dumb as it wants everything it measures to come out middle gray or 18% gray (meaning that only 18% of light is reflected off a subject)
- has more or less three settings
- spot - measures a small spot in the center of your viewfinder and can be the most accurate if you're in the know
- center-weight - measures the spot and several areas around it
- multi-segment (aka evaluative or matrix) - measure sections in all areas of the viewfinder and usually "smarter" now with current camera models giving more "accurate" exposures
using meters with AE modes
being able to spot meter is one of the many reasons photographers
move up to higher camera models. why? because it can be use as
a key to getting exposures close to what you want.
now in AE modes you select one side of the equation and the camera
will select the "proper" aperture or shutter speed to balance it off.
borrowing a photo from homryap's post this is not your meter in AE modes...
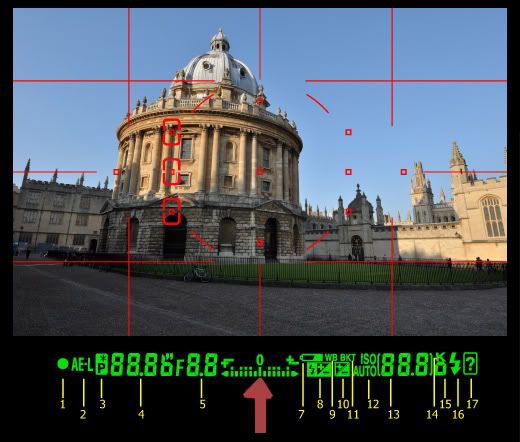
this is showing your exposure compensation adjustment... being no compensation
when set to zero. we'll get back to this.
now remember that reflective meters are very dumb. they want everything to
be middle grey as explained in Photography basics understanding exposure"Do you have your camera nearby? Take a picture of a white sheet of paper. just the white paper, without anything on it. Download the picture and look at it on the screen. Im willing to bet it came out gray-ish. Take another shot of a black T-shirt. Have a look at it, itll be gray or dark gray. Why?spot meters help beat the trickiness as you can measure smaller portions of
White or dark backgrounds can fool the camera meter. The camera tries to average everything to gray. If a scene has bright areas and dark areas, the camera can determine a proper average and from that, it can determine the exposure. But, if youre shooting tricky scenes, itll fail (even a sunset or a portrait against a white wall can be considered tricky, so dont think you wont encounter such cases)."
a scene like the subject itself. the closest you can probably get in entry-level
cameras would be center-weight.
so now you can get a good meter reading. now what do you do with it?
shooting in AE mode and knowing that the meter is measuring for middle gray
you can now compensate accordingly. how much you compensate will be indicated
in your viewfinder as shown above.
but how much to compensate? this where knowledge of the zone system comes in to play...
- Zone system - Wikipedia, the free encyclopedia
- A simplified zone system for making good exposures
- The Zone System
different brightness levels are categorized into different zones. each zone
being a one whole stop difference from another zone. searching the web
you can find lists of different things and what zone they fall in and you'll
know how many stops up or down you will have to compensate your exposure.
hint-hint: most filipino skin falls under zone V
now using meters in manual mode?
I'll save that for another day
-
02-09-2010, 12:14 PM #179Senior Member
- Join Date
- Dec 2009
- Posts
- 958
good for you bro.. Originally Posted by tiffanybam
-
02-09-2010, 12:20 PM #180Senior Member
- Join Date
- Dec 2009
- Posts
- 958
nice tips sir.. Originally Posted by abortretryfail

 Reply With Quote
Similar Threads |
|
 Posting Permissions

|