


NOTE: due to our forum not be able to display more than 20 images, I'll be splitting this into 3 post...
part 1/3: https://www.istorya.net/forums/networ...l#post17936265
part 2/3: https://www.istorya.net/forums/networ...l#post17936278
part 3/3: https://www.istorya.net/forums/networ...l#post17936304
greetings to all!
I would like to share my experience with Sophos UTM 9.
This will cover the installation process, and a bit of configuration and a little sample of QOS for gaymes like dota2 and crossfire ph.
You may consider this a mini guide/reference!
credits goes to various websites.
note(s) and disclaimer:
- very long post with pics and vidz!
- this is not for the faint of heart!
- prepare paracetamol, dolfenal or equivalent
- I'm not an affiliate of Sophos.
- I may not able to reply asap or help you with your problem.
sophos website link: https://www.sophos.com/en-us/product...e-edition.aspx
wikipedia link: https://en.wikipedia.org/wiki/Sophos
I am now using and evaluating the "FREE" Sophos UTM 9 'home edition' as my current firewall/router + anti-virus web scanner and I'm moving away from pfSense as it seems to be too hard to configure for my taste..., or I'm just too dumb using it.
Sophos UTM 9 is an enterprise grade UTM (Unified Threat Management) and the best part of it is that they offer "free" for home use!, although the limitation I see from this is just "LIMITED" to 50 IP's. So for regular home use, I believe you will not be able to reach 50 IP's. and take good note..., You need to get a free lincense from their website.
let's start with what we need:
- 2x lan card/ethernet card/NIC
- p4 or atom or recent computer (if you know how to virtualize then go for it)
- 1gb ram minimum? (more recommended)
- 20gb hdd? (more recommended)
- Sophos UTM 9 iso (reference filename: asg-9.314-13.1.iso)
- (usb/flash drive) or (dvd/cdrom + blank media)
Download the iso from Sophos website and select "Sophos UTM 9" and not the new one which is "XG UTM" and be sure NOT to select hardware type ISO download but the software one or appliance.
Be sure to take note the MAC address of both NICs and their physical locations.
Transfer ISO to Flash drive or Burn to disk (your choice).
Turn on the test computer and boot our Sophos installer.
note: my installation is virtualized using:
- gentoo linux + kvm as my host hypervisor (console only!)
- 2x virtual cpus
- 2gb ram
- 25gb raw partition (via virtio)
- 2x intel lan nics being passthrough to the guest via virtio
note:
- installer might complain if you don't meet its minimum requirements, specially with 2x NICS.
- good thing about the installation media is that it is VM friendly. it detects that its inside a VM!
!!!INSTALLATION!!!
note: I made a temporary VM so that I can do screenshots (for reference) as I was not able to do the actual screenshots that I made..., but this is almost the exact things I did, except for the virtual NICs you'll see from the screenshot(s)
This is the first thing you'll see..., press 'enter'
Some info..., select 'Start' and press 'enter'
Hardware detection phase...
Result from detection phase...
take note that the HDD and NICs here are just dummies
Keyboard selection (self explanatory...)
Timezone (self explanatory...)
Date and Time
note that if your BIOS is local time, untick/uncheck "host clock is UTC"
Very important!!!
the selection here will become your internal "LAN" and the other one will be "WAN"
this will be where you will be 'logging-in' from your UTM
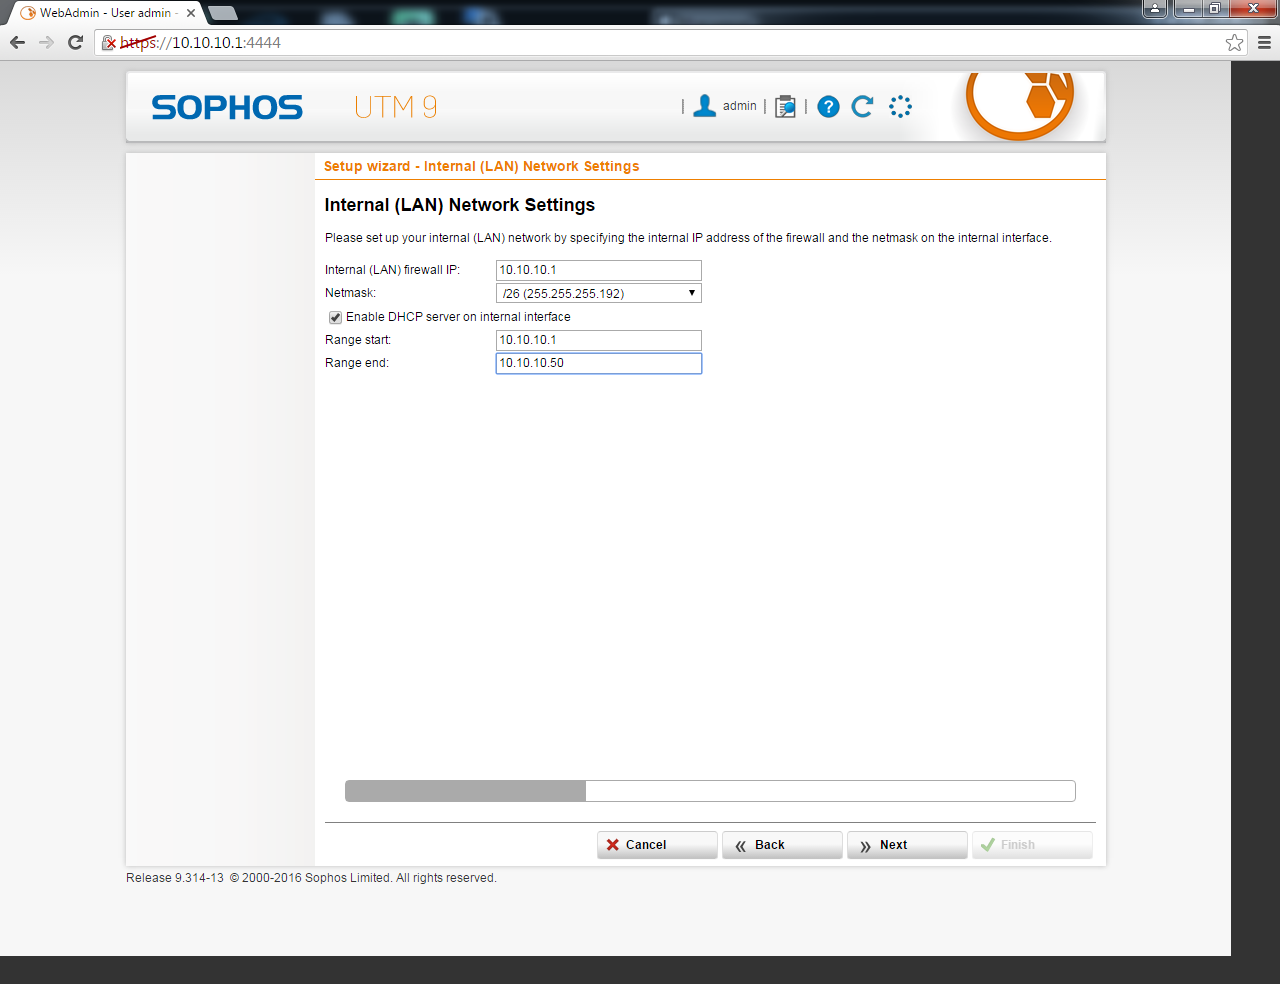
Provide your IP range... (I used 10.10.10.0/26)
I'm trying to limit my network to just around 50 connections/IP's
you can still use the famous 192.168.x.1 here and if you do, netmask should be 255.255.255.0 and do not copy what I have there
note: just leave the gateway blank for now
Since my environment is 64bit capable, I chose to go with the 64bit kernel
kindly read some explanations here
READ and select "Yes"
READ and select "Yes"
note: there seems to be no option for custom partition layout here...
Some info...
And take note here, specially with the "https://x.x.x.x:4444"
this address will be the one you will be 'logging-in' afterwards...
and then hit reboot...
You'll see this when booting your hardware after the first boot
This blackish screen will tell you something again...
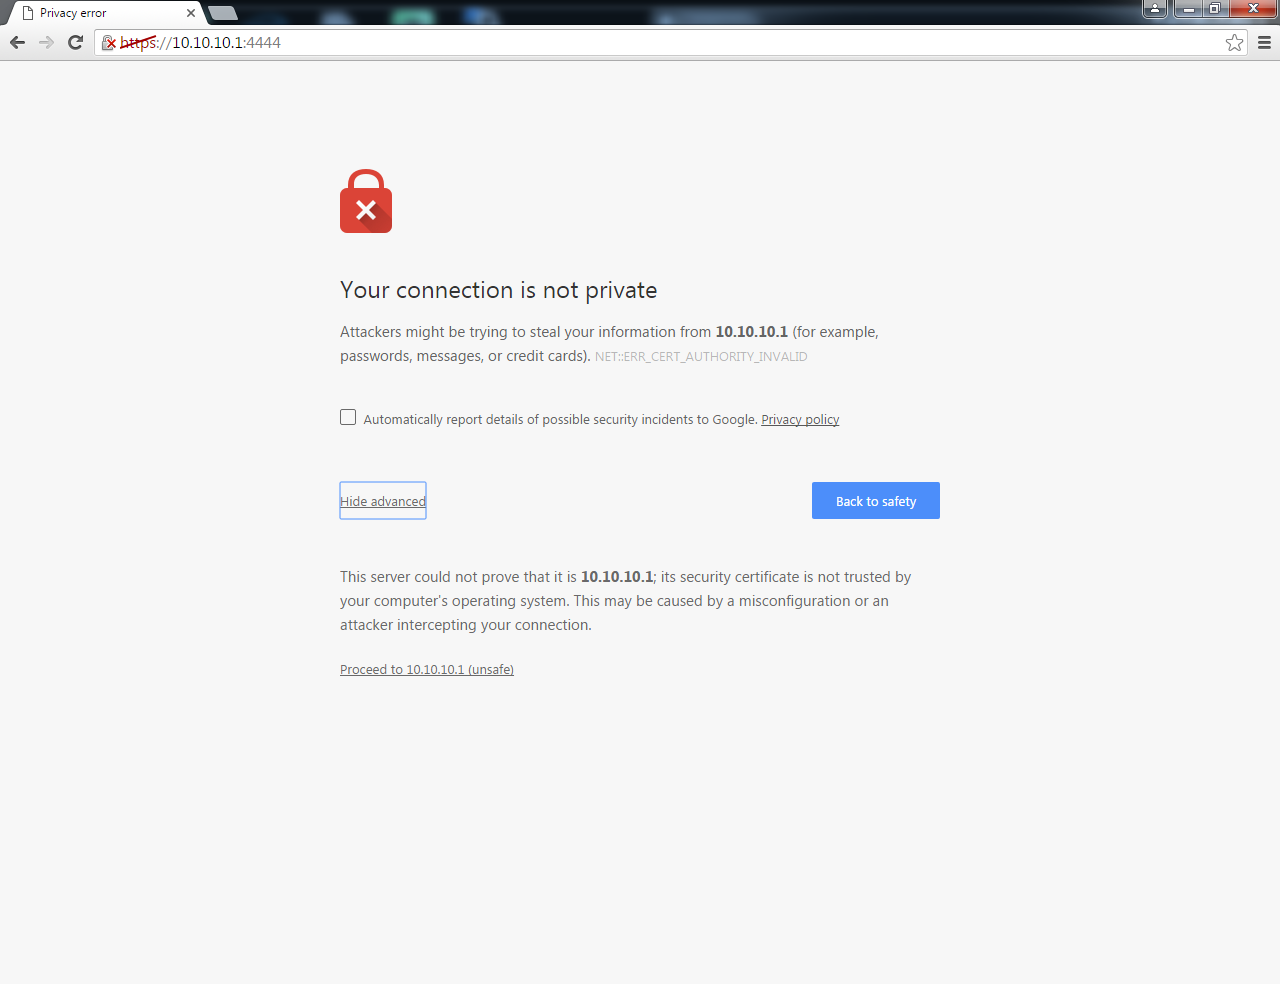
Open now from another computer and type in the "https" sequence...
click the small advanced word and click "proceed to x.x.x.x (unsafe)
Results 1 to 10 of 15
-
01-31-2016, 12:57 PM #1Elite Member


- Join Date
- Aug 2009
- Gender

- Posts
- 1,477
 Sophos UTM 9 Home Edition [mini info]
Last edited by dab_s_bad; 01-31-2016 at 02:06 PM.
-
01-31-2016, 01:19 PM #2Elite Member
- Join Date
- Aug 2009
- Gender
- Posts
- 1,477
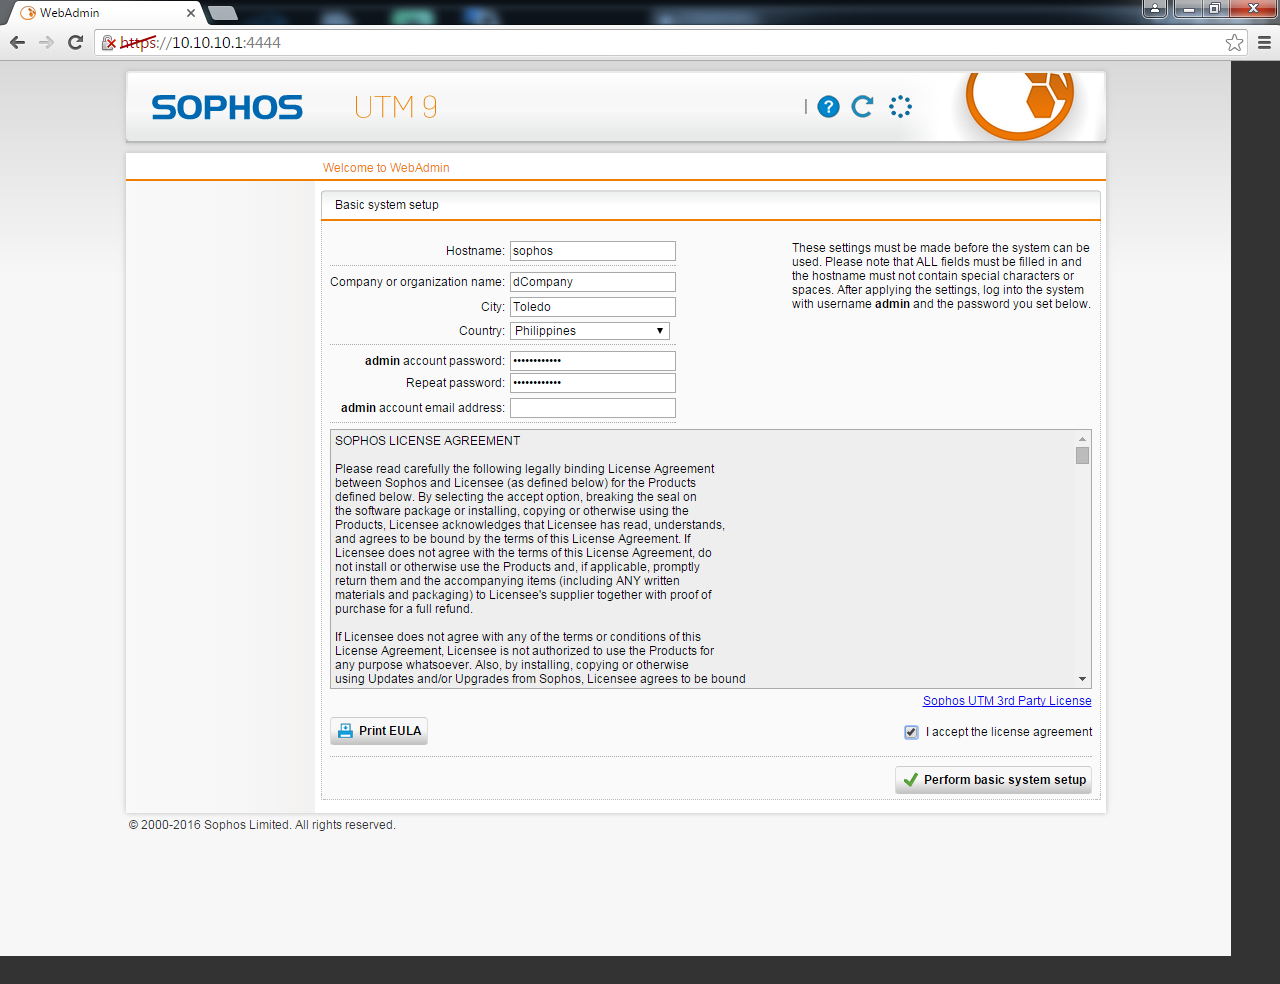
Fill all things here... and do accept its license agreement
take note that after you press "Perform basic system setup" there will be a green small text just below the "Print EULA" button tells you to wait for 40 seconds... as you might miss that and you may assume that the screen is something... and you'll see again the "your connection is not private" then click "proceed to x.x.x.x (unsafe)

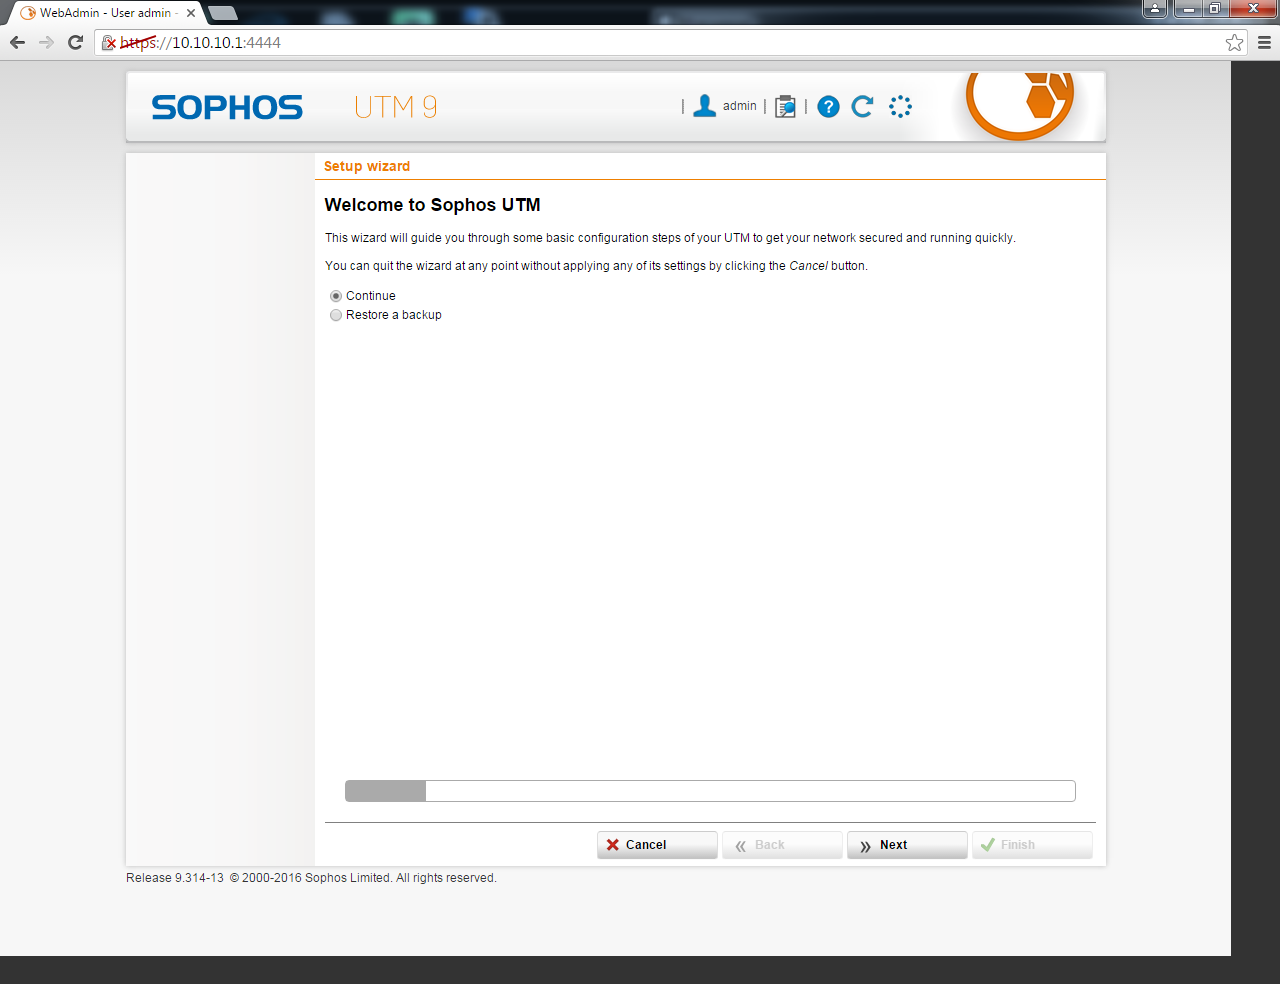
Now provide your credentials

click "continue" unless you have a backup
provide the license file if you have it already

Here, click "Enable DHCP server" and provide your IP range (mine I limit it to 50)
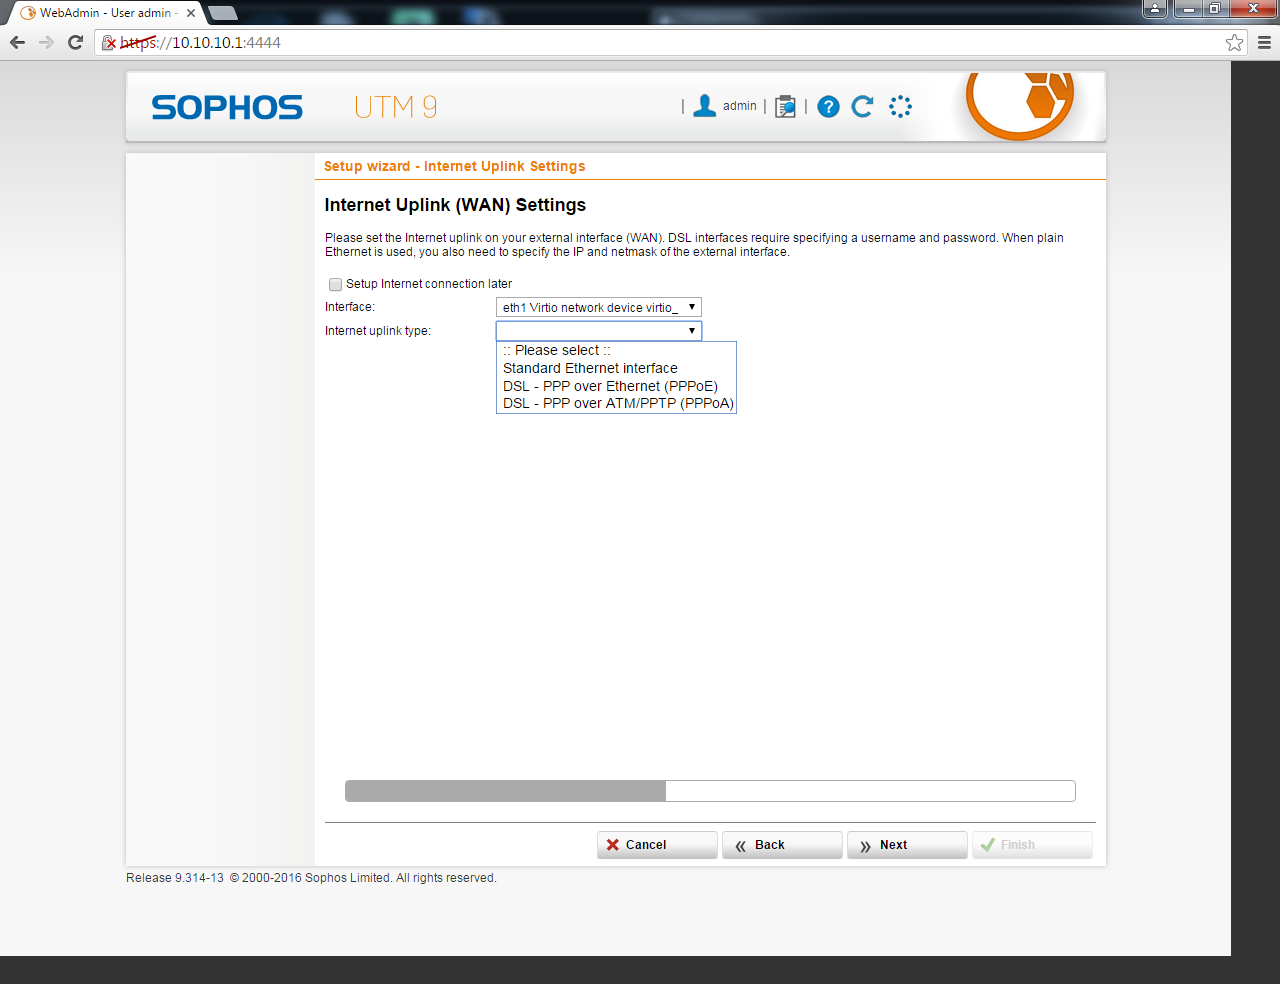
Here is for the WAN settings,
if you select "PPPoE/PPPoA" then it will ask you for a username and password (best option!)
if you select "Standard Ethernet interface", you can chose either get IP dynamically or static.
most people will select the "Standard Ethernet interface"
select the things you need here...
basically..., what you select here will grant access/pass thru the firewall
note: if you dont check "UTM forwards pings"..., you can't ping anything from the internet!!! but you can browse none-the-less...
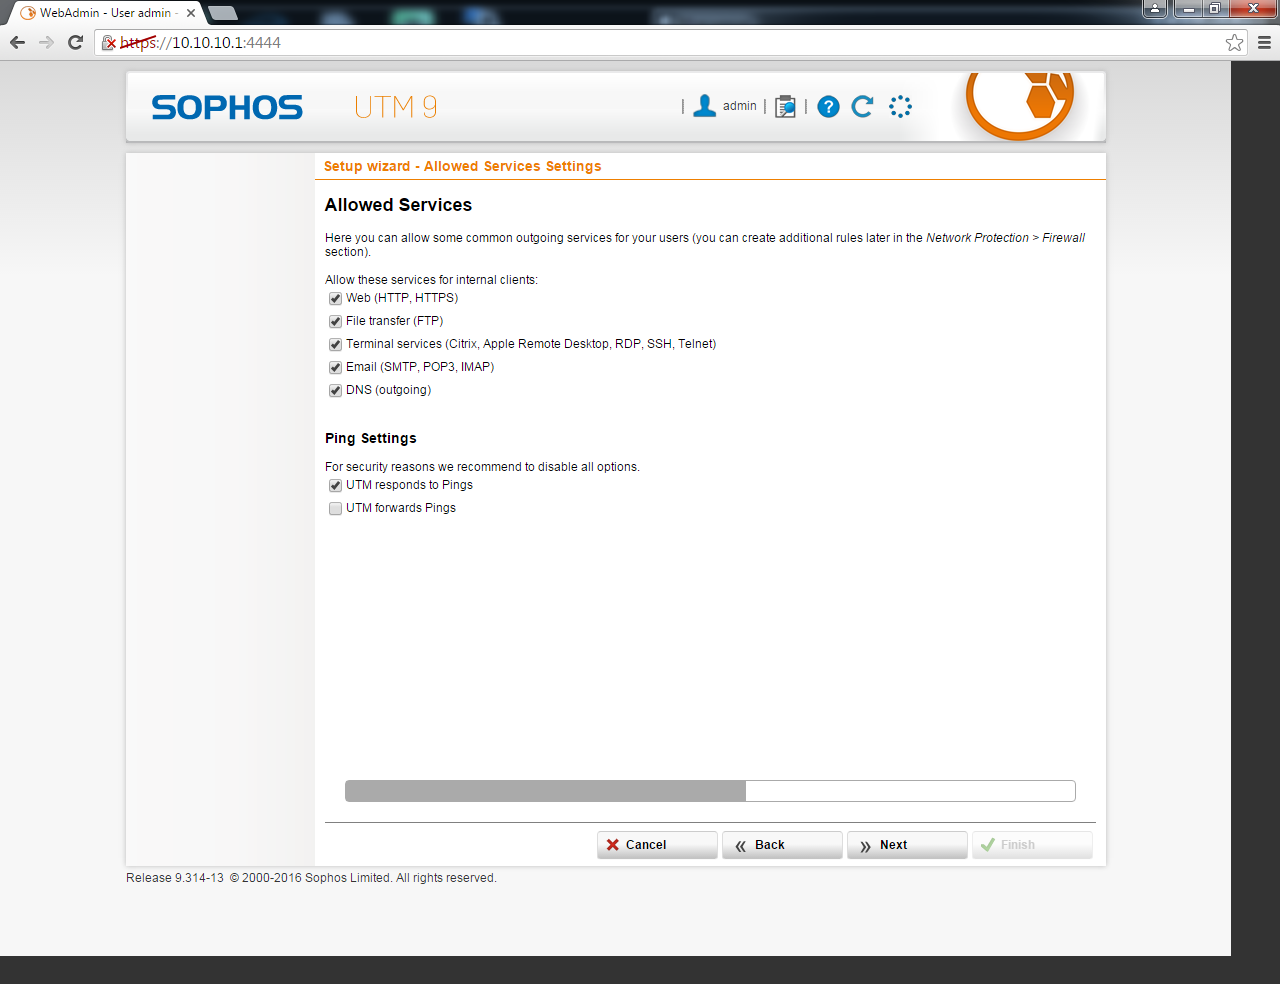
check both, very important!

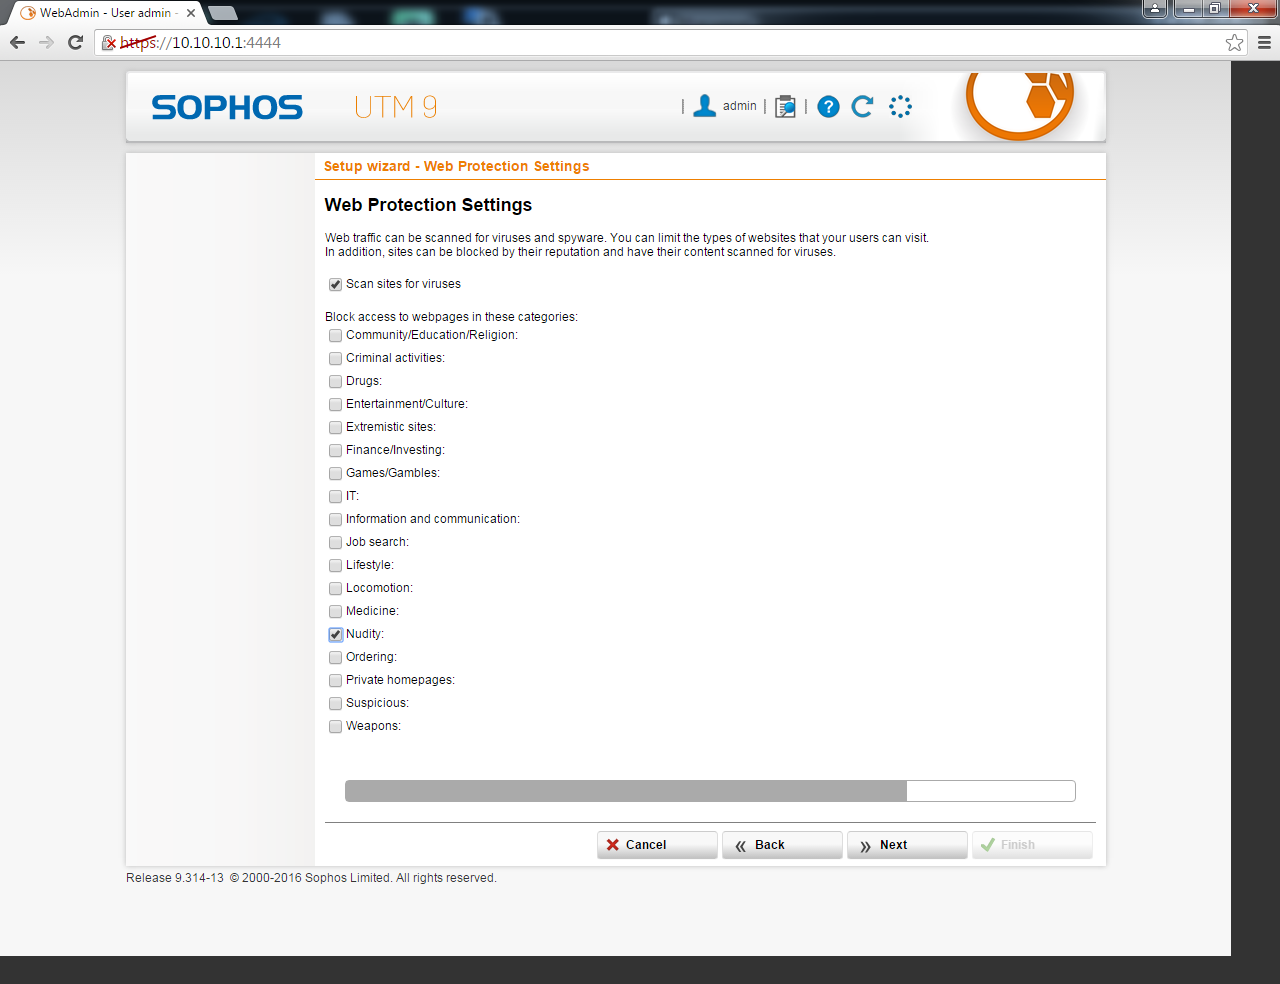
select things here that you want to be blocked
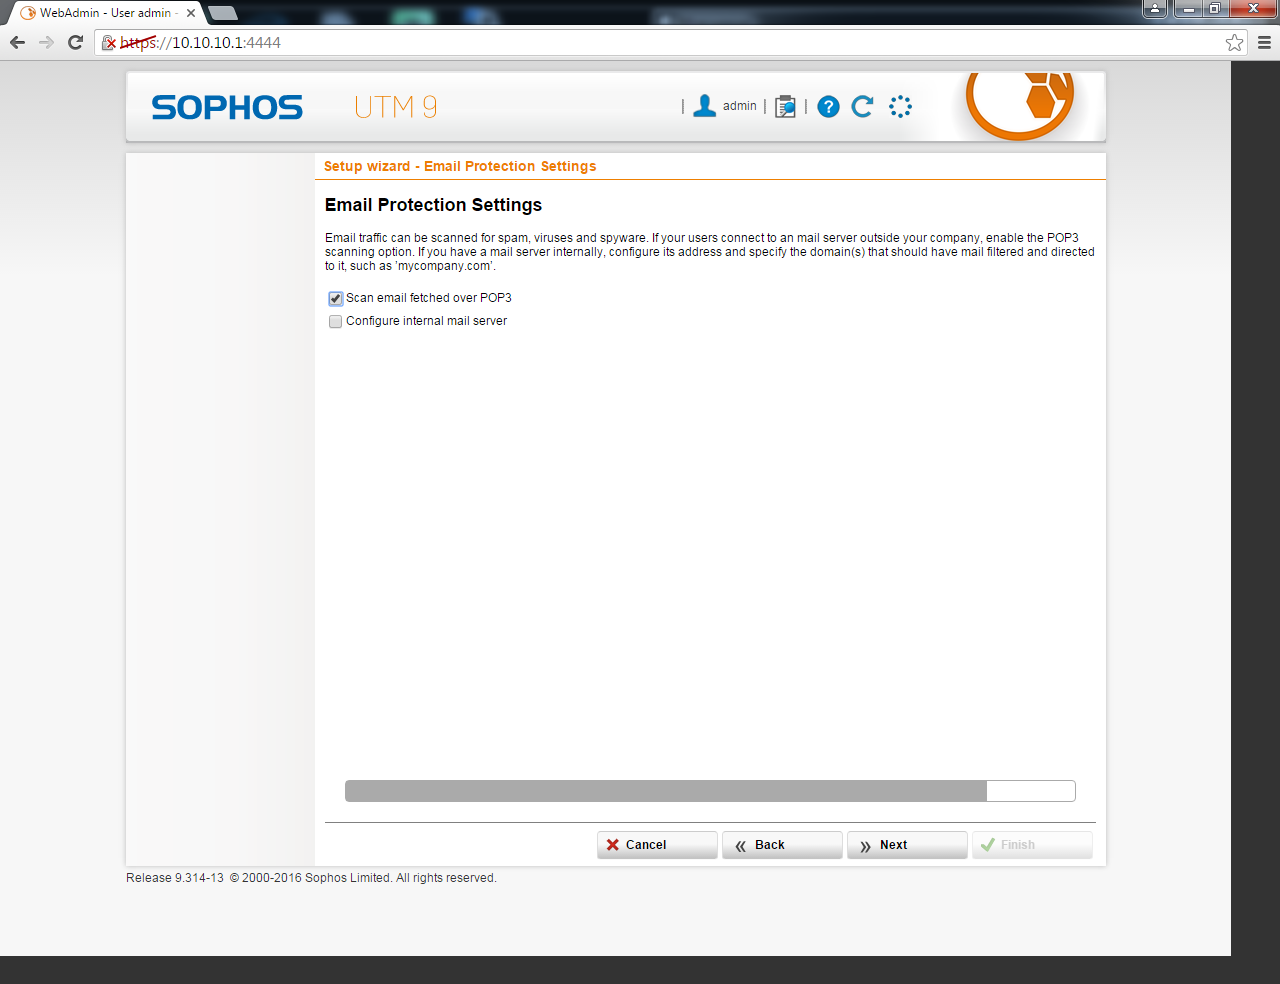
email..., better check the first one, check the second one if you have a home email server also
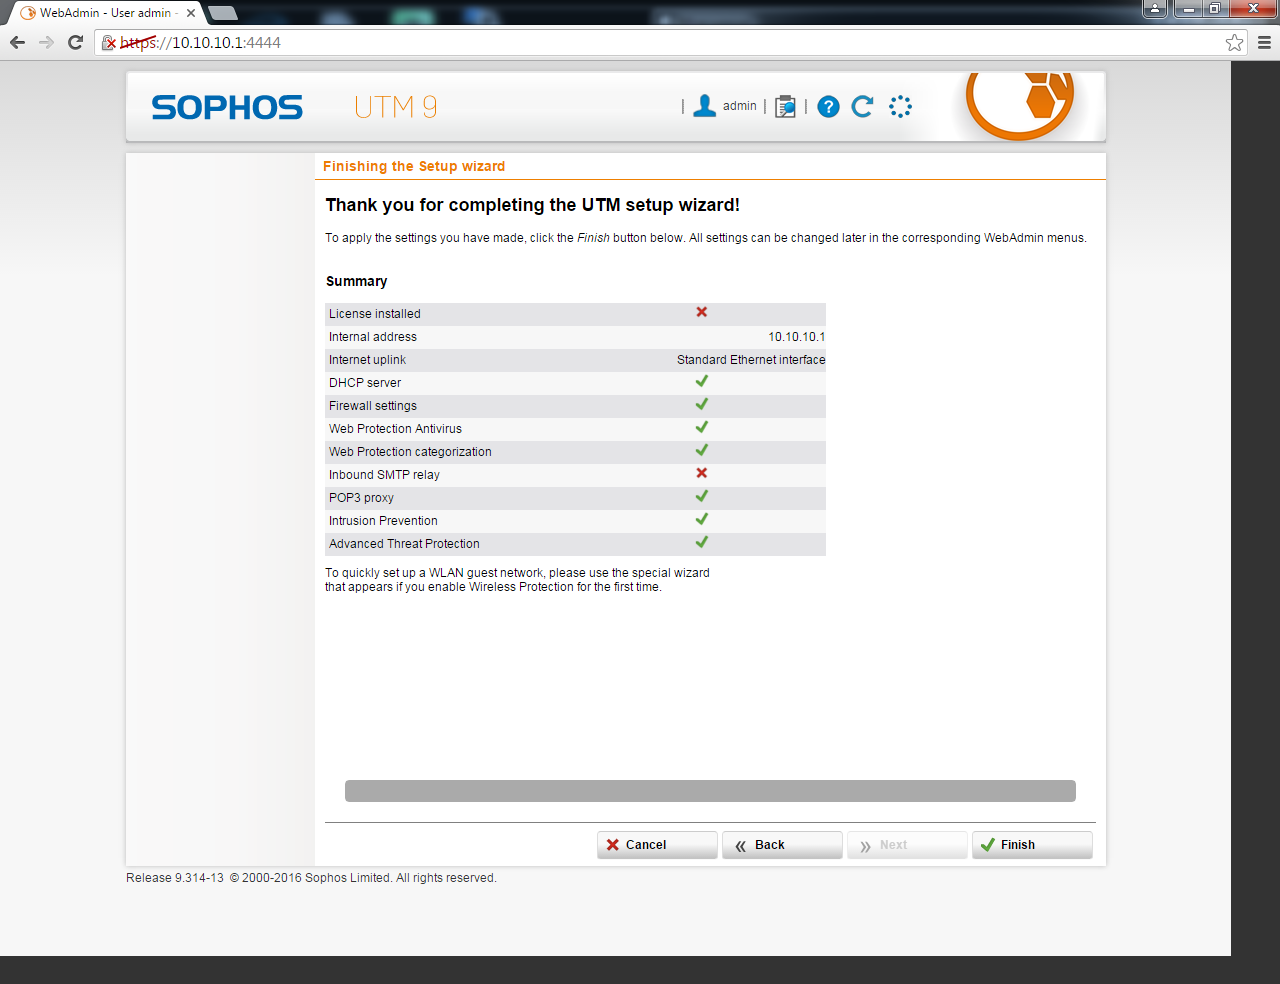
Summary before executing them out
click "Finish"
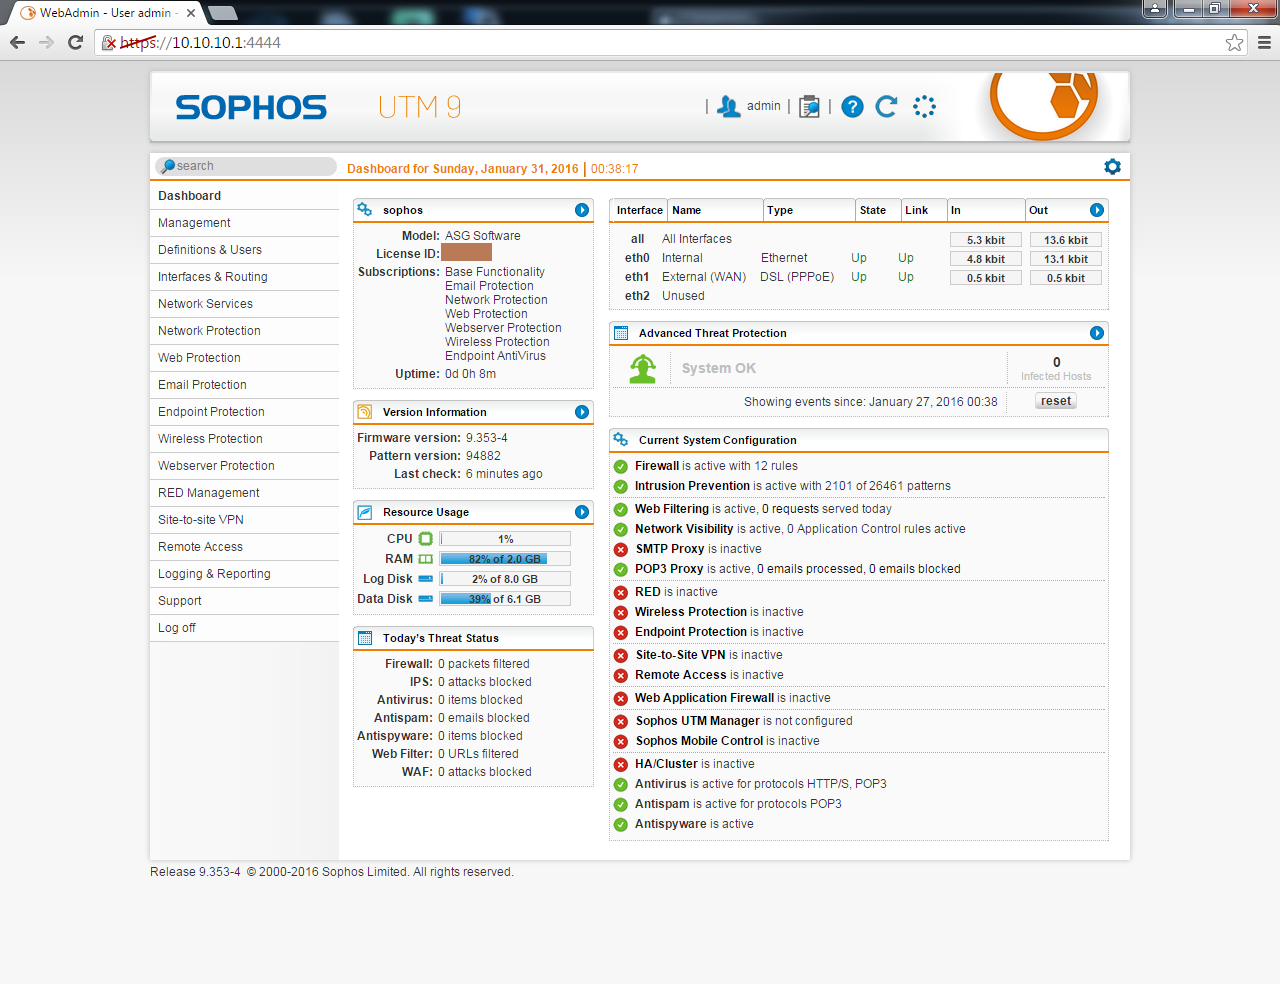
Here is your dashboard (this is the actual one now on mine)
Last edited by dab_s_bad; 01-31-2016 at 01:44 PM.
-
01-31-2016, 01:43 PM #3Elite Member
- Join Date
- Aug 2009
- Gender
- Posts
- 1,477
!!!QOS!!! the heart and soul..., and the ability of not blaming the LAG on someone or something else...,
now we go with the fun part!, but before we begin, note these ports used for Dota2 and steam (+Crossfire)
dota2 [official]
UDP 27005
UDP 27015:28999 (meaning 27015 to 28999)
steam [official]
TCP 27014:27050
UDP 4380
UDP 27000:27036
crossfire ph
[this is far from the complete list as I don't have any OFFICIAL source of its proper range]
TCP 9110
TCP 10008
TCP 13006
TCP 16666
UDP 12001:12071 [these range are proximate from lowest to highest I've seen from debugging these ports]
UDP 13001:13071
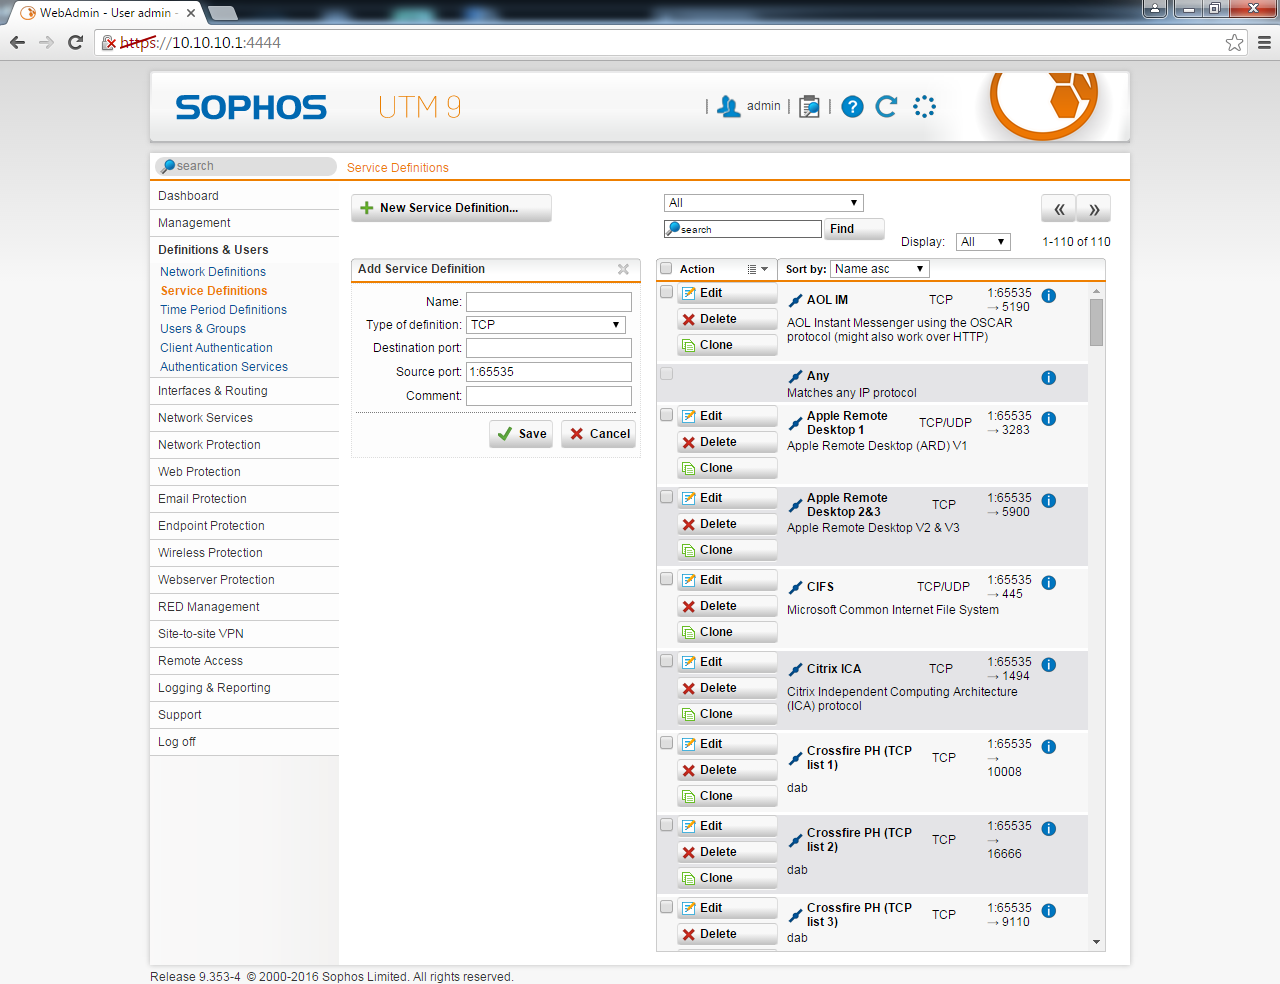
go to this screen then click "New Service Definition..." button
Name: dota2 UDP list1
type of definition: UDP
destination port: 27005
source port: 1:65535 (leave as-is)
comment: its-up-to-you
don't forget to hit save
click again "New Service Definition..." button
Name: dota2 UDP list2
type of definition: UDP
destination port: 27015:28999
source port: 1:65535 (leave as-is)
comment: its-up-to-you
then hit save, then repeat for other ports and take note its UDP or TCP
TAG XYZ...
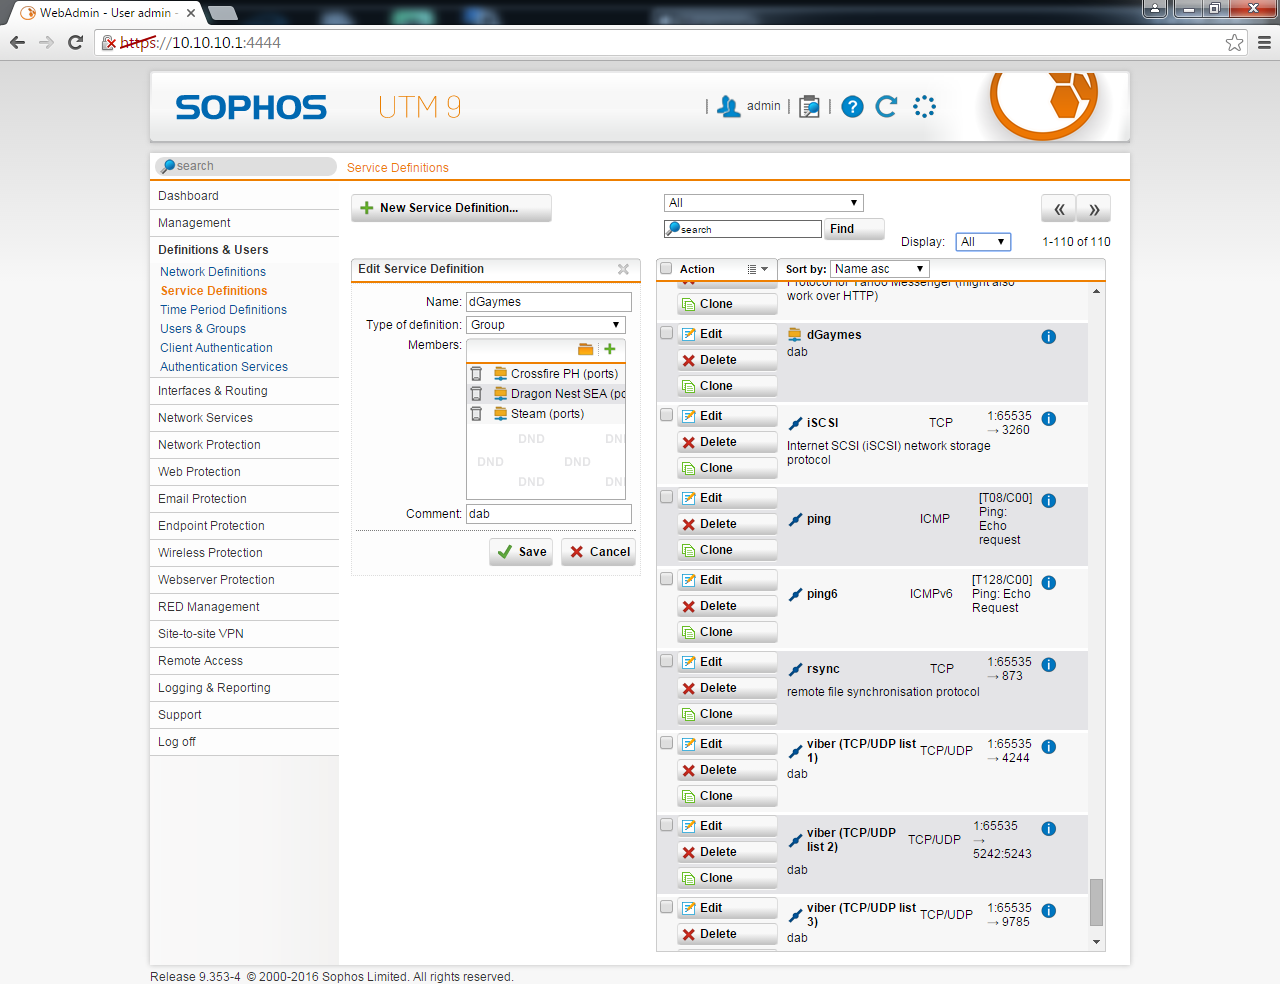
after you have created the new service definitions, now you create a group
name: steam (ports)
type of definition: group
then click the yellow folder icon and you'll see some list in the left what we have created earlier.
drag them as you can see from the screenshot then hit save

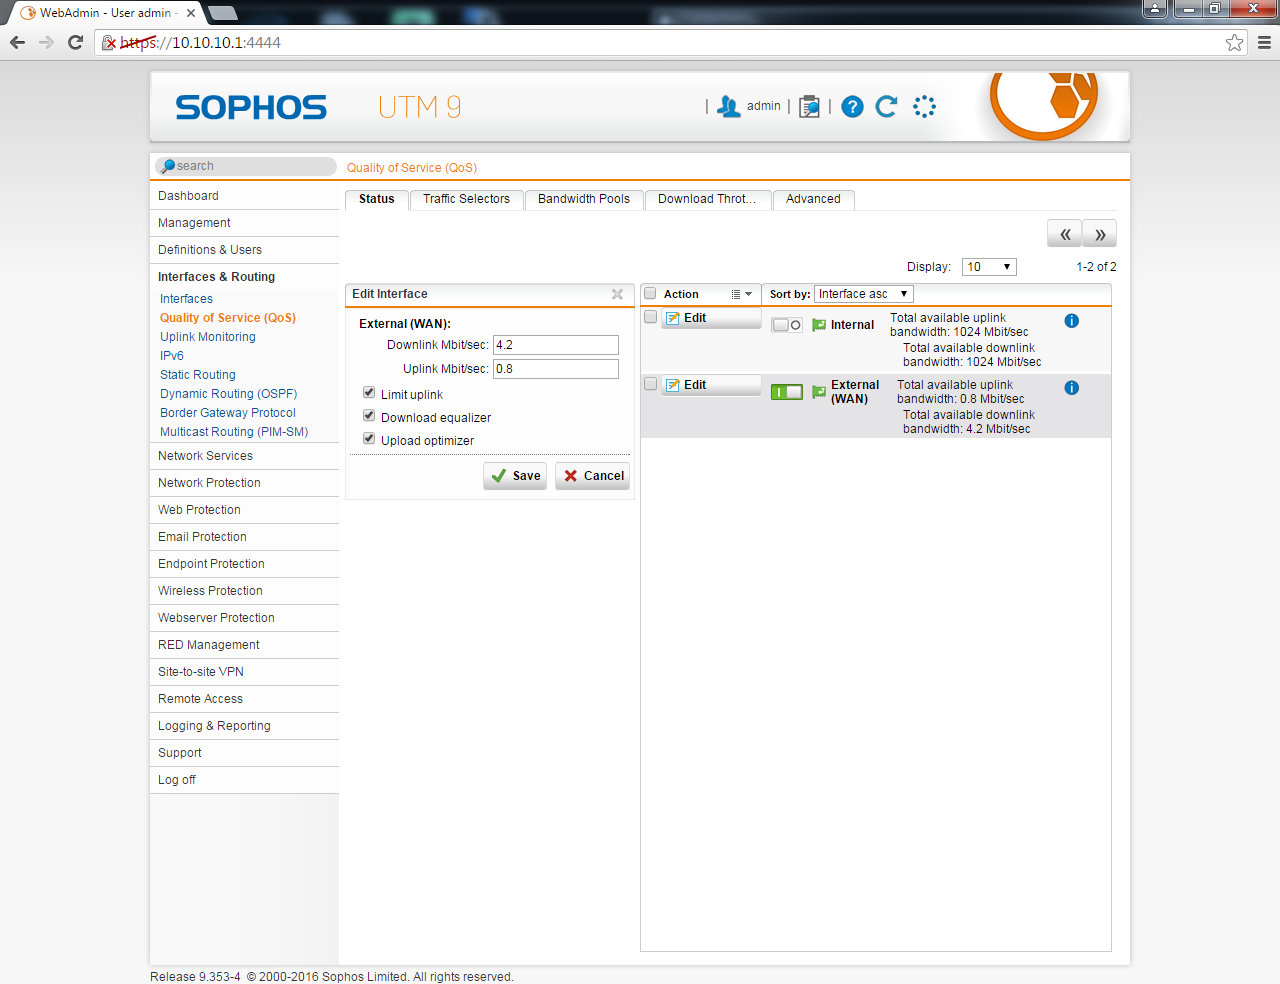
Head to this screenshot and edit the WAN interface...
this step is very important for our QOS to indicate our limits
for this, you may try to do a speedtest and see its actual upload and download speed/values and note it.
in my settings, I have a 5mbps connection but I only see it have a download speed of 4.7mbps (average) and an upload of .86mbps..., I put a limit to 4.2mbps down and .8mbps up
and..., don't forget to hit the greenish switch/button just left side of "External (WAN)" to enable it
This screenshot is just for you to see that I created groups of groups for our gaymes
click the traffic selector tab and click "new traffic selector"
note: to select selector type, source, service, click the yellow folder beside each stuff and select from the list in the left and drag them to its appropriate places
name: your-description-here
selector type: traffic selector
source: choose "internal network"
service: here will be the service definition you have created, preferably this will be the groups we created above, look at TAG XYZ above
destination: any
hit save

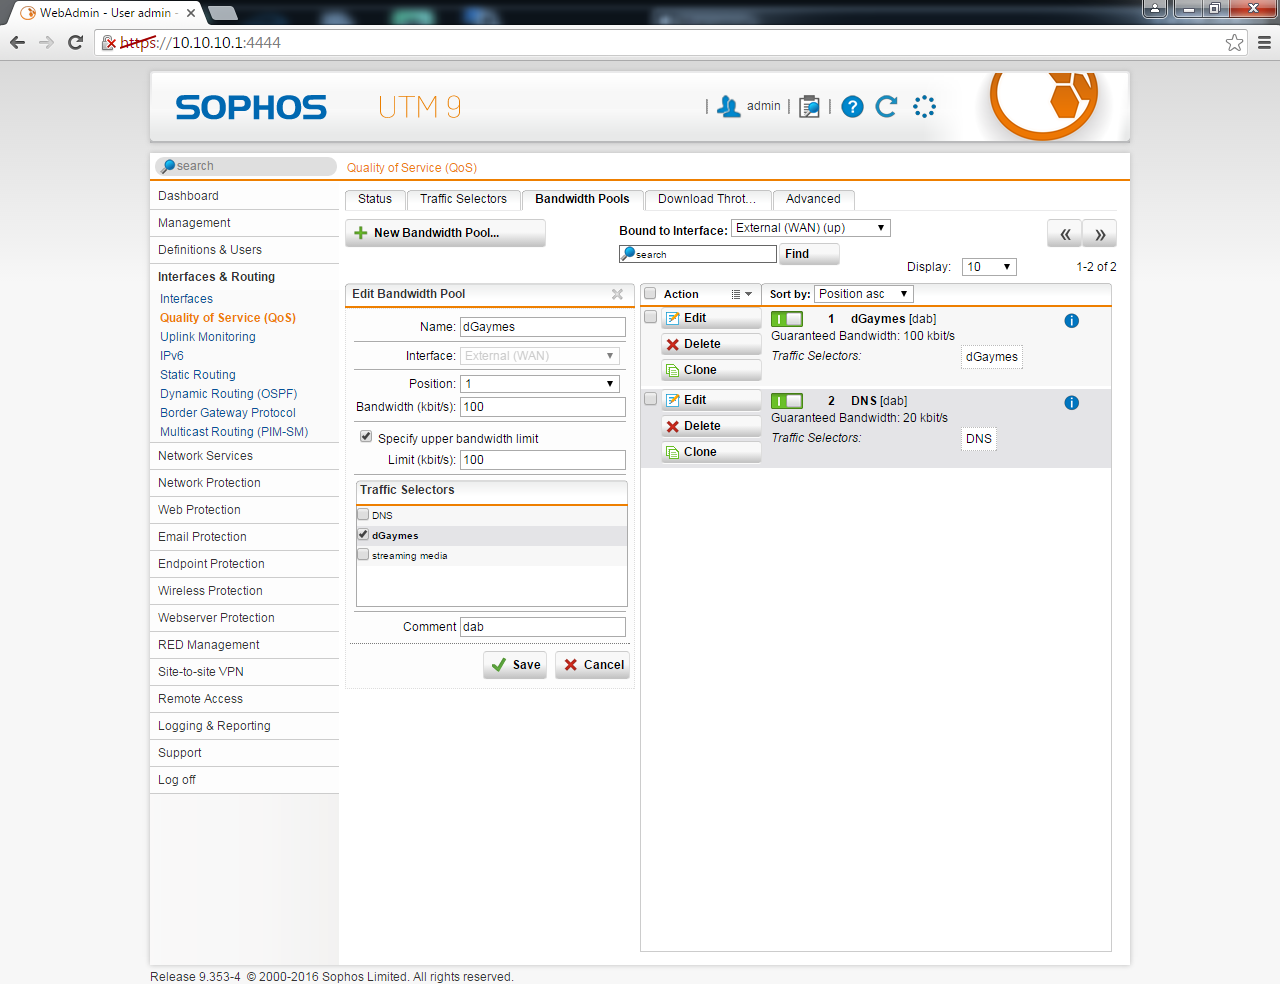
Now we go to "Bandwidth Pools" tab
make sure that "External (WAN) (up)" is the one selected before clicking "new bandwidth pool"
name: you-decide
interface: External (WAN)
position: X [number 1 as the highest priority]
bandwidth (kbits): xxx
you may check "specify upper bandwidth limit"
traffic selector: you may check the one you have created which is just above this screenshot
bandwidth here is to say that our router/firewall will dedicate 100k for our gaymes and if you specified the upper limit, then it will not go beyond that limit!
hit save and dont forget to tick/click to enable it [the small greenish rectangle]
and then..., you test..., hope it works.
!!!VIDZ!!! it wont be complete if there are no vidz...SEEing is believing...
Crossfire with QOS turned off + 1080p youtube (1 instance)
Crossfire with QOS turned on + 1080p youtube (2 instances)
Last edited by dab_s_bad; 01-31-2016 at 07:36 PM.
-
01-31-2016, 03:17 PM #4Elite Member
- Join Date
- Aug 2009
- Gender
- Posts
- 1,477
Some Q and A
Q: cant do torrent anymore.
A: all torrent ports blocked by default (am not able to do torrent also, still trying to unblock ports)
you need to setup proper ports for your torrent for it to be able to work properly
Q: cant visit <insert-website-here>
A: if your website is blocked, you need to add them to an exception list
Q: na-unsa naman ni oi!, hasta facebook..., wala nay klaro ang iya mga display, wala nay picture(s)/etc
A: you need to unblock facebooks CDNs also (content delivery network)
Q: ka-kuti aning mananapa oi, halos dili naman ko ka-browse ani
A: unblock it or remove sophos it entirely/replace it with something else that is not too strict!
-
02-23-2016, 09:43 AM #5Elite Member

- Join Date
- May 2011
- Gender
- Posts
- 1,141
educational ni nga post da. thanks ani!
-
03-03-2016, 07:24 AM #6Junior Member

- Join Date
- Sep 2007
- Gender
- Posts
- 431
nice nice, will try this to my network at home. daghan kau mu gamit gud nya dli mkaya e manage kung QoS lng. ty for this really nice post.
-
03-04-2016, 02:39 PM #7Elite Member
- Join Date
- Aug 2009
- Gender
- Posts
- 1,477
 Originally Posted by kevitzrey
 salamat! Originally Posted by yufa333
hope that it can give you good info and such...
-
03-04-2016, 03:03 PM #8C.I.A.

- Join Date
- Dec 2012
- Gender
- Posts
- 3,664
Mao ni gamit sa amo opis. eheh pero waLa koy Labot sa pag setup hap. Nice ni siya.
-
03-12-2017, 11:30 PM #9C.I.A.

- Join Date
- Apr 2005
- Gender
- Posts
- 4,211
@dab_s_bad Salamat boss sa explanation, nindot na imo gamit kay pwd maka creat ug group para QoS..
ang ako-a nga router sa pikas nga thread nako kay, ako g ask ang tech support tp link wala na daw feature ang Version 7 nga QOS
so ako ni syang e parehas ana manual butang2x nako gyd kata usa..
gusto ta nako nga samtang nag games while viewing youtube..dili sila mo lag...same anang imoha pero sa karon, mo abot paman ug 200+ ang ping nla pag mag dota at the same time youtube.
msg nya tika boss then ako e screenshot..patabang ko nimo set-up ani aron maka sabot2x sad ko..
let me know kng pwd pa tabang nimo para ma msg tka..
salamat ka kuha ko idea ani gyd.
-
03-12-2017, 11:42 PM #10Elite Member
- Join Date
- Aug 2009
- Gender
- Posts
- 1,477
you need to add manually gyud, for steam/dota, hurot na nimo butang tanan ports nila? like these below? Originally Posted by libido
dota2 [official]
UDP 27005
UDP 27015:28999 (meaning 27015 to 28999)
steam [official]
TCP 27014:27050
UDP 4380
UDP 27000:27036


 Reply With Quote


Advertisement
Similar Threads |
|
 Posting Permissions

|